Eyes are a very important part of a stuffed animal. Just a small change to an eye’s size, shape, or position can significantly change the expression of the toy. Also, the choice of eye depends on the intended recipient of the stuffed animal. For example, you don’t want to use buttons for eyes on a toy meant for a baby because they are too easily detached and will become a choking hazard.
Here at Crafted by Becca, I make sure all my stuffed animals have eyes that are safe for all ages. Usually, I choose to embroider the entire eyes, but for larger animals, I like to use a technique called appliqué. I thought you would enjoy a breakdown of the two different styles of eye that I use and how both are made.
Let’s start with embroidered eyes, since that’s what I use the most. The first thing you want to do is make a template for your eyes. Use your template to mark out the position and shape for each eye. This will ensure that both eyes match as closely as possible.
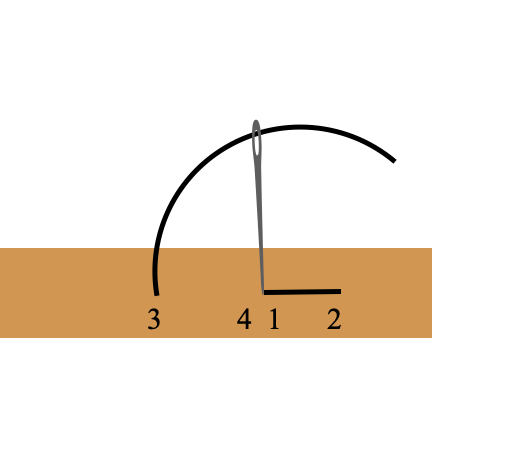
After you have marked out your eyes, you can decide what stitches you want to use for embroidering. I generally use two different stitches for my stuffed animals and dolls. The first stitch is a basic backstitch. To make this stitch, you simply bring your needle up through the fabric, bring it back down behind your starting point, and come up again in front of the starting point. The next stitch goes back to the starting point then forward a bit more, giving you a line of connected stitches. I use this embroidery stitch to make the irises on my dolls and to outline the eyes on my platypus stuffed animals.
For the pupils on my dolls and platypuses, I use a satin stitch. A satin stitch is good for filling in an area with a series of smooth stitches. It works best for small areas. With a large area, the stitches will either be too loose, or they will bunch up the fabric.

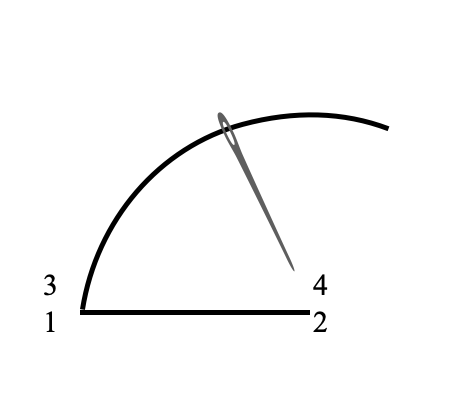
To make a satin stitch, you bring your needle up through the fabric on one side of the area you wish to embroider and then make a stitch across to the opposite side. Your next stitch comes up just above your starting point and goes across to just above the end of your previous stitch. Continue in this fashion until you have filled in the entire pupil.
Congratulations! Now you can make some simple embroidered eyes on your next stuffed animal project. Next time, I’ll show you how to make appliqué eyes. See you then!